Here is a tutorial on how I made my animated ocean scene on Sketchfab by using animated modifiers and shape keys in Blender.
Here is the scene I am talking about.
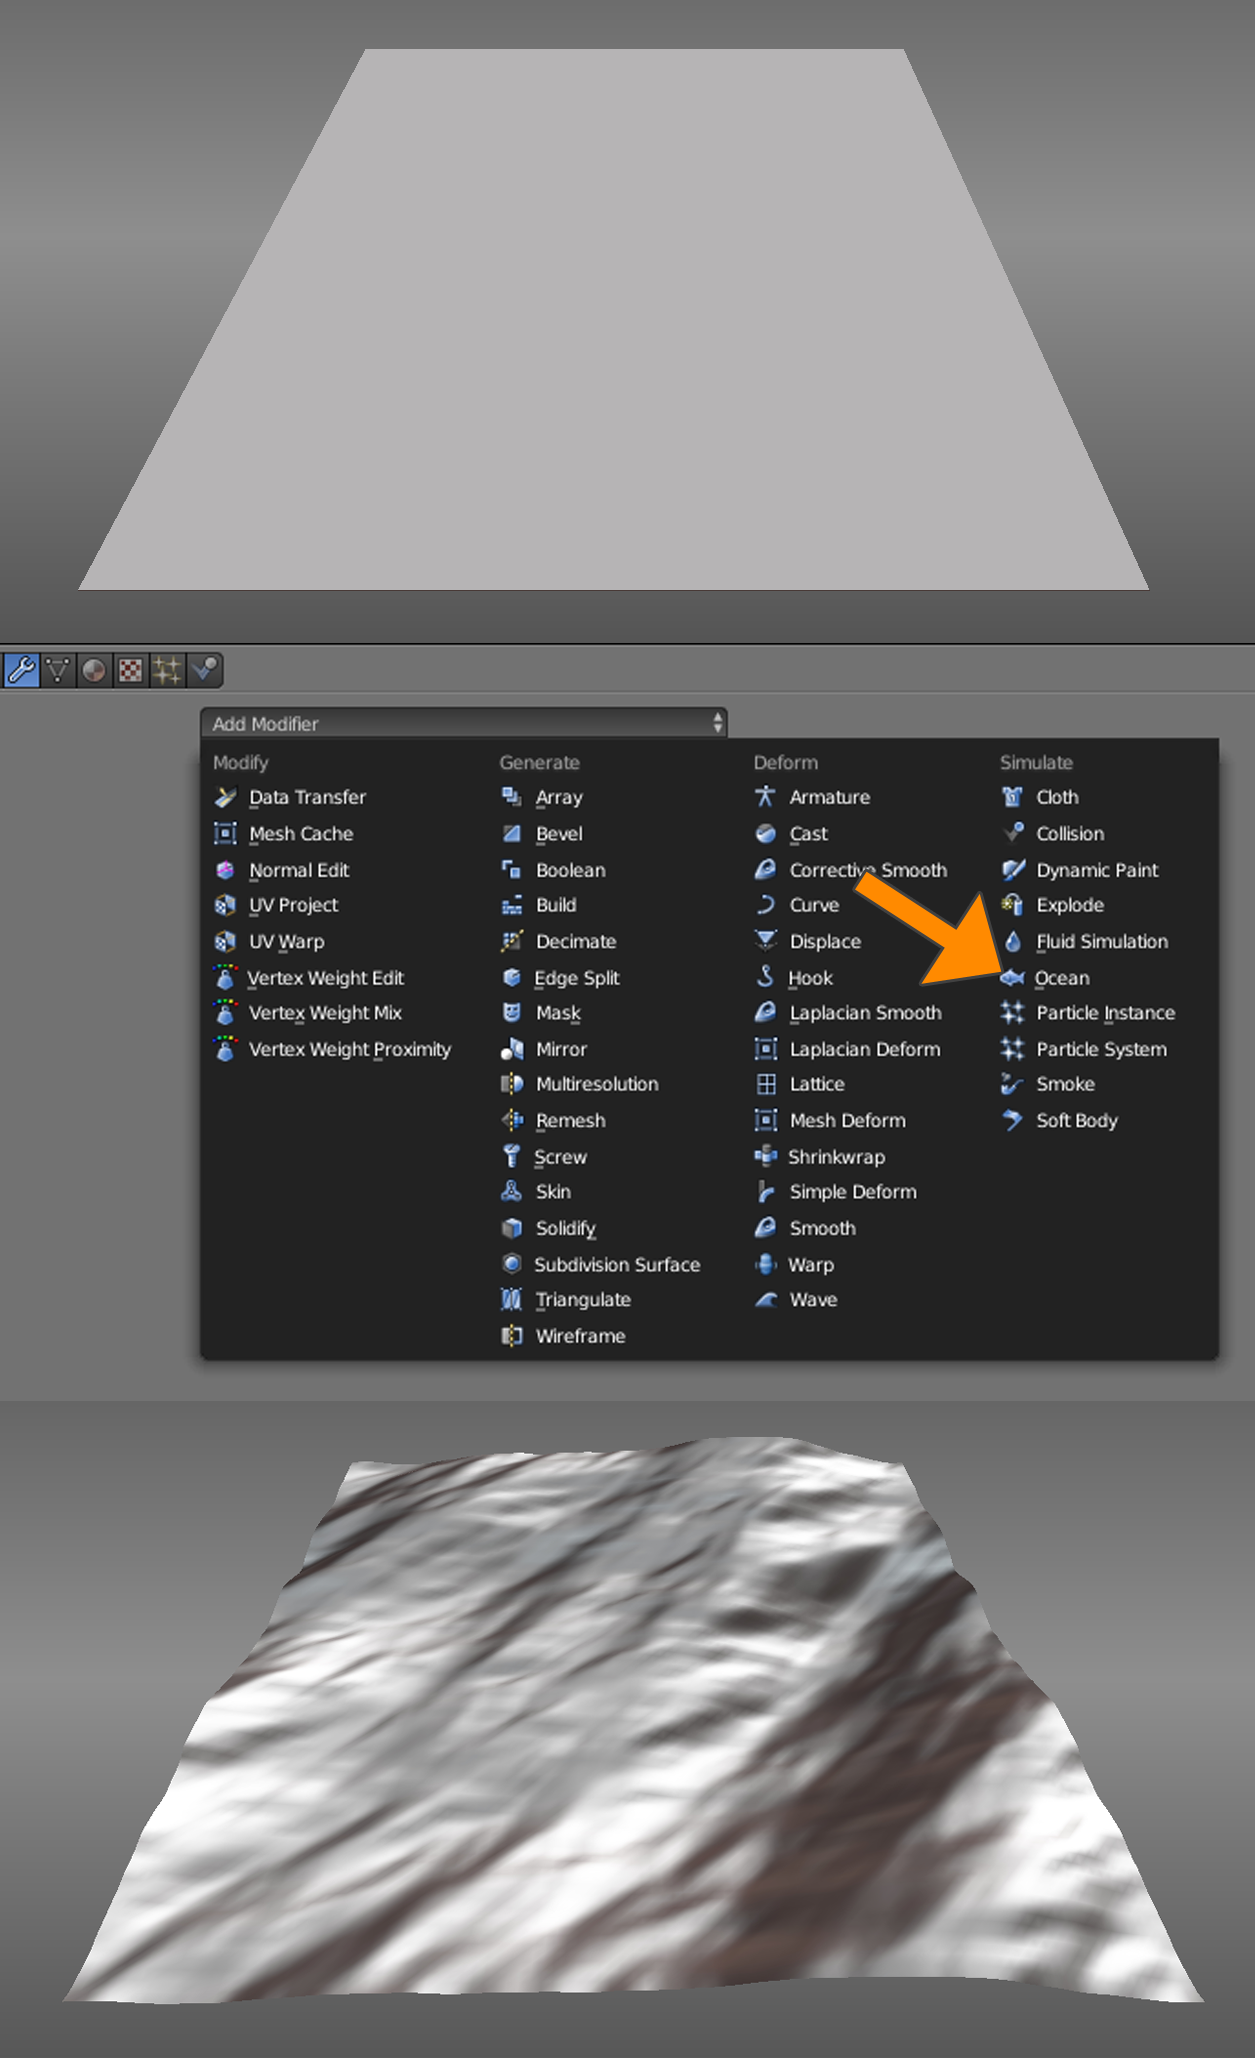
First add a mesh object. I used a plane but you can use any mesh object, like a cube, sphere or the monkey.
Select the object and click on ‘Add Modifier’ and choose the Ocean modifier.
Animating the Ocean Modifier
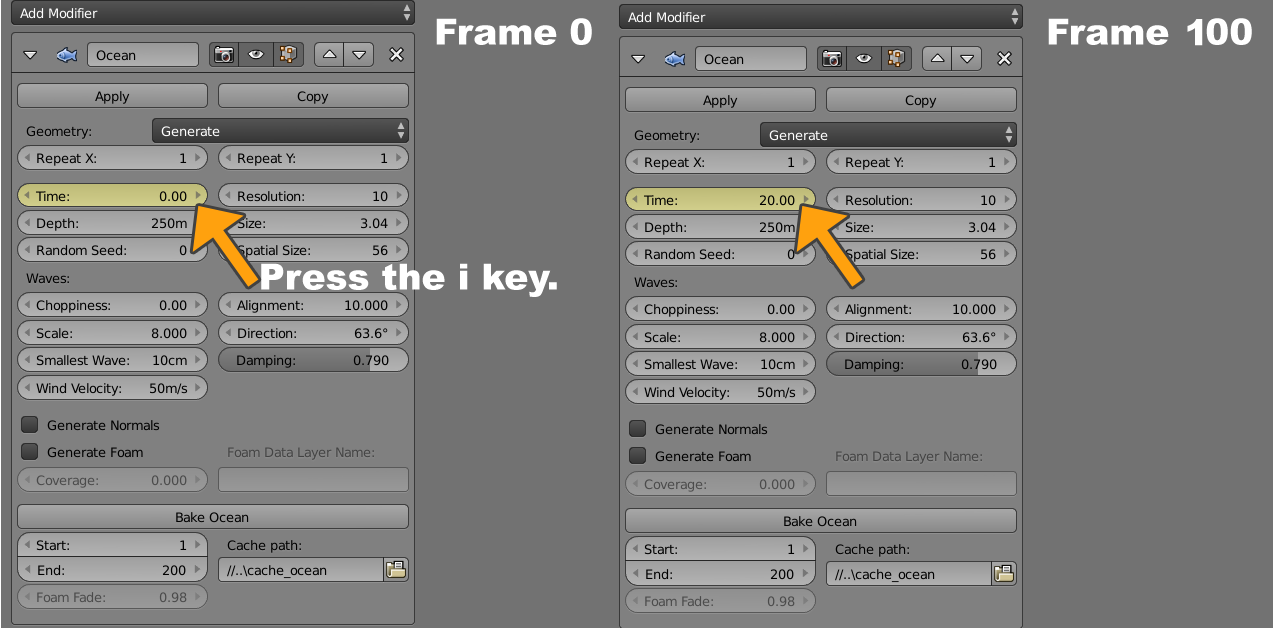
To animate the Ocean modifier, set the current scene frame to 0.
To do this, hover over ‘Time’ in the ‘Modifier’ panel and press the ‘i’ key so time 0.00 is the key frame for frame 0.
Then go to scene frame 100 and set ‘Time’ to 20.00 and key it by pressing the ‘i’ key again.
Now you have an animated ocean which starts slowly and ends slowly during the animation.
This doesn't look natural because the animation is interpolated as ‘Bezier Curve, so let’s fix that by making the animation uniform / linear.
There are two ways to do this; by using the Graph Editor or the Droop Sheet Editor.
I used the Graph Editor to see the animation curve for the modifier from frame 0 to 100 in one graph.
Into to graph editor window: select the start and the end point of the graph by pressing the ‘a’ key, so you select everything that is contained in this window.
Under ‘Key/Interpolation Mode’ you can define the handles of the graph. Select ‘Linear’ to get an equal increase and a uniform ocean animation.
Converting the Ocean Modifier into shape keys for a use on Sketchfab
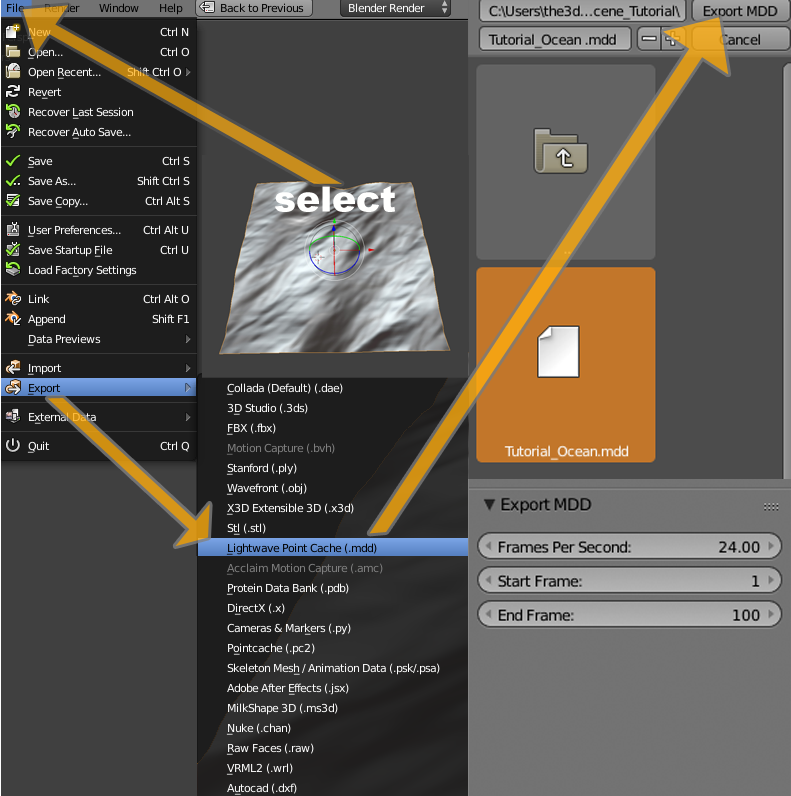
First, select the object with the ocean modifier and export it as Lightwave Point Cache (.mdd). File/Export/Lightwave Point Cache (.mdd)/Export MDD).
In the Export MDD settings as well as the render settings, you can define the frames per second and start / end frame of your animation.
Now a copy of the object with the ocean modifier is needed.
Copy it with Shift + D and put it on another layer with the M key.
Choose an empty layer. Go to the layer where your copy is.
To transfer the Lightwave Point Cache (.mdd) to the copy the ocean modifier must be applied.
But before that, set the waves scale to 0.000 to get an even surface.
Why was this done?
The Lightwave Point Cache (.mdd) file needs the same vertices, so the ocean modifier had to be applied (because the animated vertices are saved into the .mdd export per frame).
Remember, the object with the Ocean Modifier is just a plan; so this must be done.The even surface makes it easier for objects to interact with, like a boat (by using Vertex Groups).
More about this later.
Now import the Lightwave Point Cache (.mdd) file to the new object. Select the surface, press ‘space’ and enter ‘Import MDD’.
Select your MDD file and click ‘Import MDD’. You are now done and have your shape keys in Blender.
You can now upload it to Sketchfab and you will get something like this:
Now I will show you how I have break the waves with an object in combination with a Shrinkwrap Modifier for the ocean object.
Find or create an object you want to use like a boat, flotsam, etc.
This object will be used for the Shrinkwrap Modifier; we will setup for the ocean object later.
Create a vertex group for the ocean object to mark the vertices which will be influenced by the Shrinkwrap modifier.
Select the ocean object and go into the Weight Paint Mode to paint on it.
Painting on the ocean surface will cause a new vertex group to be created automatically.
The vertex group is named ‘Group’; name it as you wish.
Since I am lazy, it is still called ‘Group’ ;)
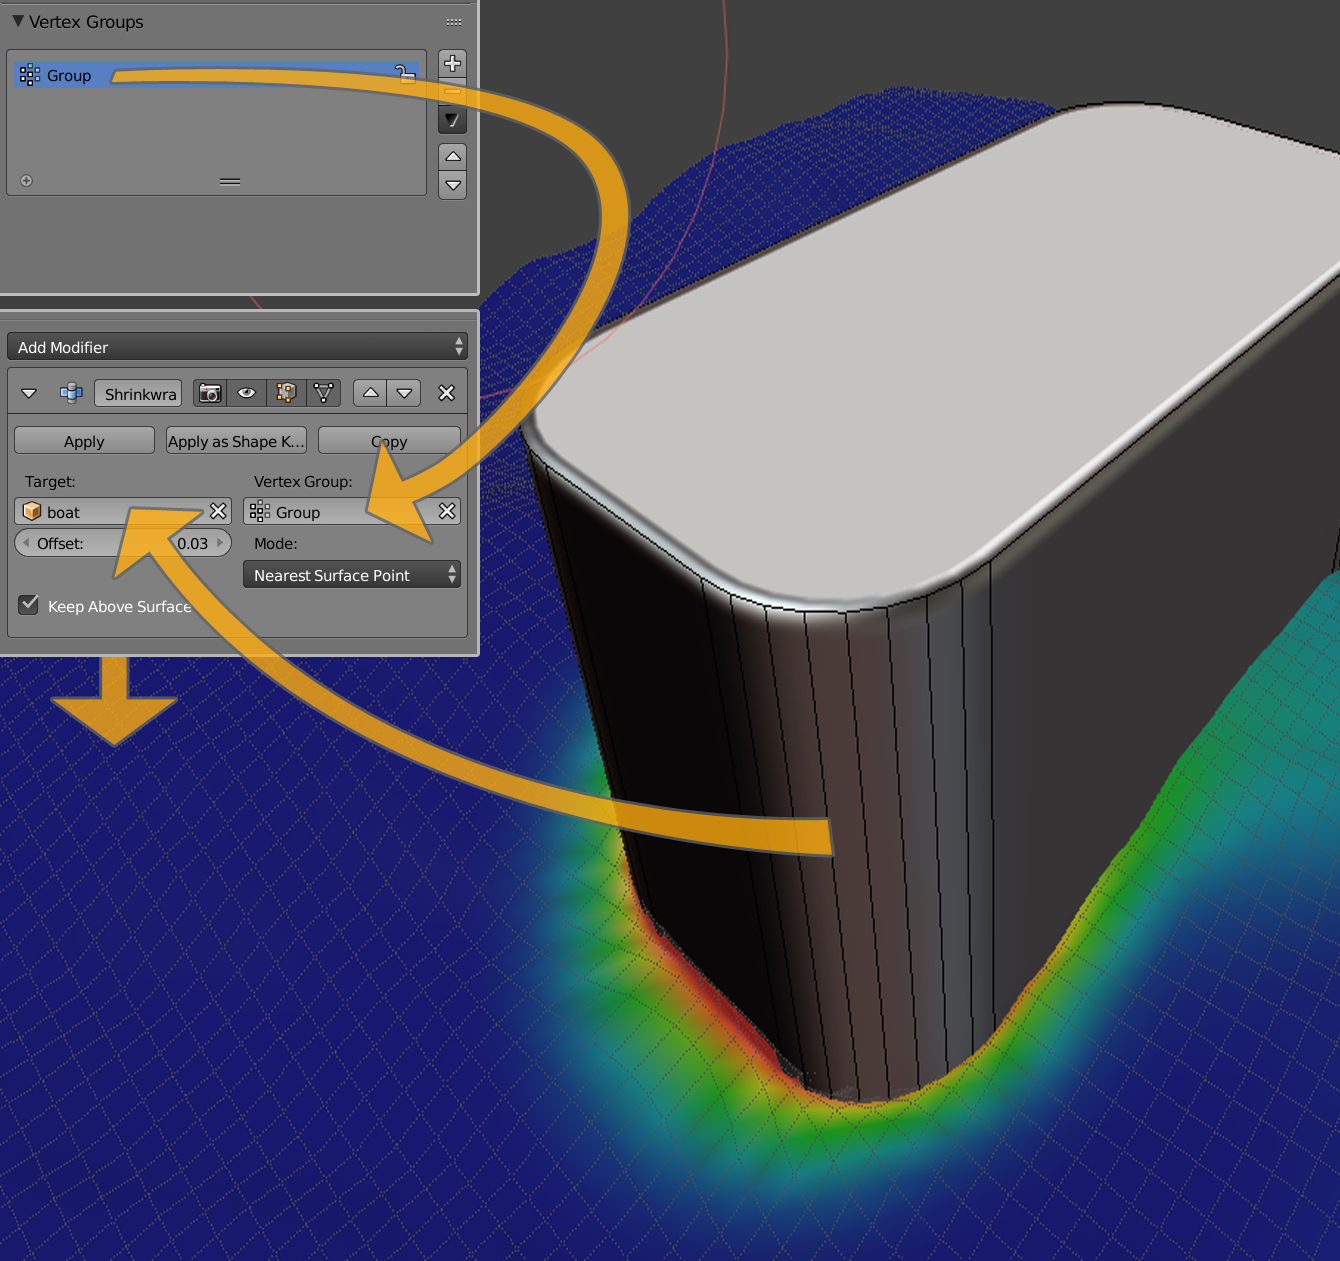
Enter your group into the vertex group section of the Shrinkwrap Modifier.
Also the object for the Shrinkwrap must be satisfied.
In my case it is called boat.
After this you can play your animation to see how it looks and to fix your vertex group if you are not satisfied with it.
(For a better result I have used two Smooth Modifiers and another Shrinkwrap Modifier in an arrangement like you can see in the picture below.
For the Smooth Modifiers I have taken the same vertex group like I used for the Shrinkwrap Modifier.)
Almost Done
If satisfied with your scene, export the selected ocean object as Lightwave Point Cache (.mdd) and reimport it like explained before.
Do not forget to delete the Modifiers and the old Shape Keys before importing the new Lightwave Point Cache (.mdd) to the ocean object.
Tutorial result:
Thank you very much for reading.
I hope it was interesting and informative :)


